Dave's Backyard Reno: Pool Restoration & Timber Frame Cabana Bar with Outdoor Kitchen, and Luxury Patio Heaters by IR Energy evenGLO
By: Dave Hammond, owner/operator of www.PatioHeatDirect.com, a ship2user Member and online distributor of outdoor heating products, specialized in IR Energy heaters.
This post is an overview of Dave's multi-year DIY backyard renovation project: a complete inground #pool restoration with landscaping; the design and construction of a rustic red cedar #cabana with outdoor bar and kitchen, and to complete, heated using two IR Energy evenGLO Natural Gas Heaters (E301NUS - Fixed Post Mount), and the subsequent launch of (herein) Patio Heat Direct (.com). All Rights Reserved
Where to begin ...
THE HOUSE – 2011

When my wife and I first moved into our 45-year old Cape Cod style home 8 years ago, there was no shortage of work to be done. Particularly during the first few years, our approach was to find ways to spruce-up the house without taking-on hefty contractor fees... ie. DIY!
In the beginning, I made a [long] list of projects to complete (I’m still only about half-way through), from basic painting of a room, changing light switches and fixtures, to knocking down walls, rebuilding the staircase, building a nanny suite in the basement, a bathroom, new flooring, etc. on and on… For each new project, I would basically tackle the oldest looking room or feature that could be upgraded with a reasonable budget, and go for it.
One do-it-yourself project after another, and pretty soon I found myself actually making a difference. Not only was the house looking better, we were saving money. As I developed my skills, I started thinking bigger and taking on more complex and higher impact projects. Despite having no training, I’ve found that good planning, a sense for design, common sense, an occasional YouTube visit for DIY how-to info, and relentless hard work was/is enough to achieve positive results.
THE POOL
One of the more significant items on my list was ‘the pool’. The property was built in the early 70’s and as far as we know, the aging 20’x40’ rectangular inground pool was installed in the early 80’s. Around the pool was a concrete deck that was cracking and rough to walk on with bare feet. The faded blue vinyl liner was caving inward at the corners and the pool was losing water (leaks everywhere, beyond easy repair). All the plumbing and pool equipment was clearly end of life. There were no stairs into the pool, just the old-school ladders. Further, the pool didn’t have inground lights, which bothered me given regular night-time use, and safety after-dark, particularly with kids. All this to say, the pool was looking tired.
It was a massive and intimidating project, and my earlier day thinking was that this sort of task was just too much of an undertaking to go-it-alone. ‘Thinking about it’ became somewhat of an obsession, and I started to develop a vision of how nice it would be to have a modernized pool with a cabana in the back corner, where at that time stood the original pool woodshed. For us, the backyard was already beautiful (taking nothing for granted), and it was one of the main reasons why we be bought the house ... but it was time for an update.
#poolbefore Pool before:


THE SHED
In the back left corner of the yard stood an 8’x12’ woodshed, used to house the gas pool heater, pool filter, and miscellaneous summer storage. We had a natural gas 24” Weber Grill as a standalone BBQ beside the shed, and some old patio stones around it. Behind the shed is a large double trunk spruce fur tree that looked similar to the others in the yard but was hidden. I couldn’t help but think – what if I could design/build a cabana that has an open concept where you could see the base of that beautiful tree. Designing the Cabana became an even bigger deal vs. the pool. I started to think about the project in two phases. Phase I – the pool. Phase II (way more interesting) – the Cabana. At this point by the way, patio heaters were not something I was thinking about; this would be a key detail and addition that would happen at project completion, discussed later in this post.

RESEARCH – 2016
In talking to neighbors and a few general contractors, a full backyard pool reno could cost anywhere from $75k to $175k+ depending on what we wanted and who we hired. Cabana design and construction could take the budget even higher. A couple hundred thousand dollars for the backyard was too much to swallow, so I started thinking seriously about – could I actually do this myself?
My first task was to call in the pros for quotes and project summaries. I had 3 pool contractors visit, and let’s just say I asked a lot of questions. One of the most important factors for me was – how many crew members and how long will the project take? The 3 contractors averaged about 30 days labor (ie. average 3 crew members on site and would do the job over 10 days). So … 1 person working weekends only --- we’re talking 15 weeks to strip down and rebuild/restore the pool with some landscaping. Since I’m a rookie and would be slower (mainly due to lack of heavy equipment), I figured it would take me around 20 weeks (working weekends) to do the job. But if I called in a few friends to help here and there, plus a week or two off work (in finance by day), voila … start the project in March after the snow melts, I might actually be able to complete by around June and have the pool open for late spring/summer!
After picking the brains of the 3 pool pros, lots of reading online, a few visits to various pool stores, and getting to know the largest pool distributor in Canada (we opened a Contractor account, “Hammond Landscaping”, which as it happens, set the stage for another start-up in Landscaping/Construction turned www.NaturalBrickandStoneDepot.com) … I decided to go for it and break ground/concrete! This would ultimately become my demo project to showcase and market various products used as inputs; herein being high-end luxury Patio Heaters! More about this later, on we go with the project ...
PHASE I – POOL DECK CONCRETE REMOVAL – MARCH/APRIL 2017
To prepare for concrete removal, in March of 2017, I went to work by pre-cutting the deck – renting a large walk-behind masonry/concrete saw from The Home Depot. It took a day or so to cut through the concrete & rebar at square intervals of approximately 18” by 18”. On that very first cut (pictured below), I was all-in and there was absolutely no turning back.

A Facebook invite for “Concrete Removal Day” is certain to lure your friends, right? Or was it the appeal of using a full-size jack hammer while free Heineken beer and Domino’s pizza await? On April 8, 2017, about 15 friends and family showed up ready to work … and work we did (I can't thank them enough)! On that single day of hard labor, we removed ~65,000 lbs of concrete, yanked out the old vinyl liner (the pool was drained using a submersible pump picked up from Canadian Tire), and we started the process of digging trenches to lay new pvc flex piping. On the following day, we had 4 or 5 guys left (the hard core who came back for more), and we started grading around the pool perimeter using a Tiller rented from United Rentals. At this point I really wasn't 100% sure what we were doing, but it was all about keeping my game-face on and planning ahead just enough to have an idea what to do that hour, that day, that week; ie. just keep the project moving forward toward something closer to a final destination!


![]()


After that first weekend, I felt pretty good given all the progress. But on the following weekend, early morning mid-April ‘17, when I walked outside to a cold and damp Saturday morning --- I had the rude awakening that I was now essentially running solo. My wife and kids would help, and Family here and there, but at the end of the day, I was accountable for this backyard and seeing it through to completion. It was staggering how much work was ahead. One person (give or take), a shovel, some tools, a huge pile of gravel in the driveway, heavy timber, skids of paver stones, etc. Moving dirt is hard. Raking/grading is hard. Moving rocks and digging roots and cutting steel, and so on and so on … it was endless and it was hard. Exactly what I signed up for!
POOL RESTORATION – GRADING, PLUMBING, STEPS, LIGHTS – SPRING 2017
I installed all new plumbing (2” white flex PVC hose pipe), plus new Hayward skimmer system. Note I custom cut the skimmer to fit higher/closer to grade, so the water level would be much higher than before (IMO it looks better although not as practical if you have a diving board or have frequent belly floppers). I installed full width custom steel fabricated steps along the length of shallow end (got rid of the ladders). Gone with the diving board (preferring simple design without any gimmicks; and desire for high water level). Installed 2 inground color changing LED lights, and grounded the pool. Framed and poured a surrounding concrete sub-floor for structural integrity (another Facebook invite – for “Concrete Arrival Day I”). Beautiful pavers all around. Vibrant blue vinyl liner. Etc. Etc. It came together beautifully!
Also some much needed help 'moving dirt', my wife, my kids, and my Mother pictured below with shovels in hand ... on Mother's Day 2017!


![]()


#poolafter Pool after:


Believe it or not, the pool was open by mid-June, and although finishing touches dragged into the summer, come pool-closing in October we were essentially looking at a brand new pool (minus the original galvanized steel wall structure which had almost zero rust). All in all, it was methodical, seemingly organized, and close to what I personally would expect from the best contractors in the business. I spent about C$30k on the pool, and the original 40 days’ labor turned out to be bang on. During the whole process, I paid/hired all of two people: 1. a 'gas guy' as new piping was needed given the shed location was slightly offset from previous; and 2. a fellow came in to do precise measurements for the new vinyl liner. Otherwise, this is all DIY.
Primary Input Products / Expenses:
- HPB gravel, other grading materials and misc. landscaping stuff/equipment
- All plumbing Hayward, working with SCP, and miscellaneous items from local outlets
- Concrete from Dufferin Concrete
- LED Lights – super cool, worth it for sure
- Pool Steps – steel fabricated, rock & gravel backfilled, 4” concrete fill finish
- Coping – Permacon Laguna Pool Coping 60 Modules, Bullnose edging
- First row of pavers behind the coping – Techo-Bloc Borealis Smoked Pine Color, with a modified Linear & Herringbone pattern
- Main backyard paver stone – Permacon Scandina Grey color, Cassara finish (has a mild degree of texture to it); purchased at Boulders Landscape Supply
- Vinyl Pool liner – from Pool360
For specific details or installation inquiries, please contact me.
PARTY TIME - SUMMER 2017
Summer '17 was our 6th annual Pool Party in this house, but given the backyard was still under construction, this was a much smaller and lower key version of our typical event. Instead of the big adult-only blow-out, we hosted a Pig Roast with Family & Friends (actually 'during' the roast, pavers were being put down).


PHASE II – SHED DEMOLITION & CABANA DESIGN – FALL 2017
By October 2017, the pool was done and it was time to kick-off the more exciting Phase II. I demolished the old shed, actually rather slowly and methodically as there were electric wires everywhere that needed to be salvaged. Those wires connect underground to the house and then to 4 switches in the kitchen which we wanted to preserve. Gone with the shed and the general area was ready to connect the pump/filter/heater, after a new concrete slab is poured come Spring.


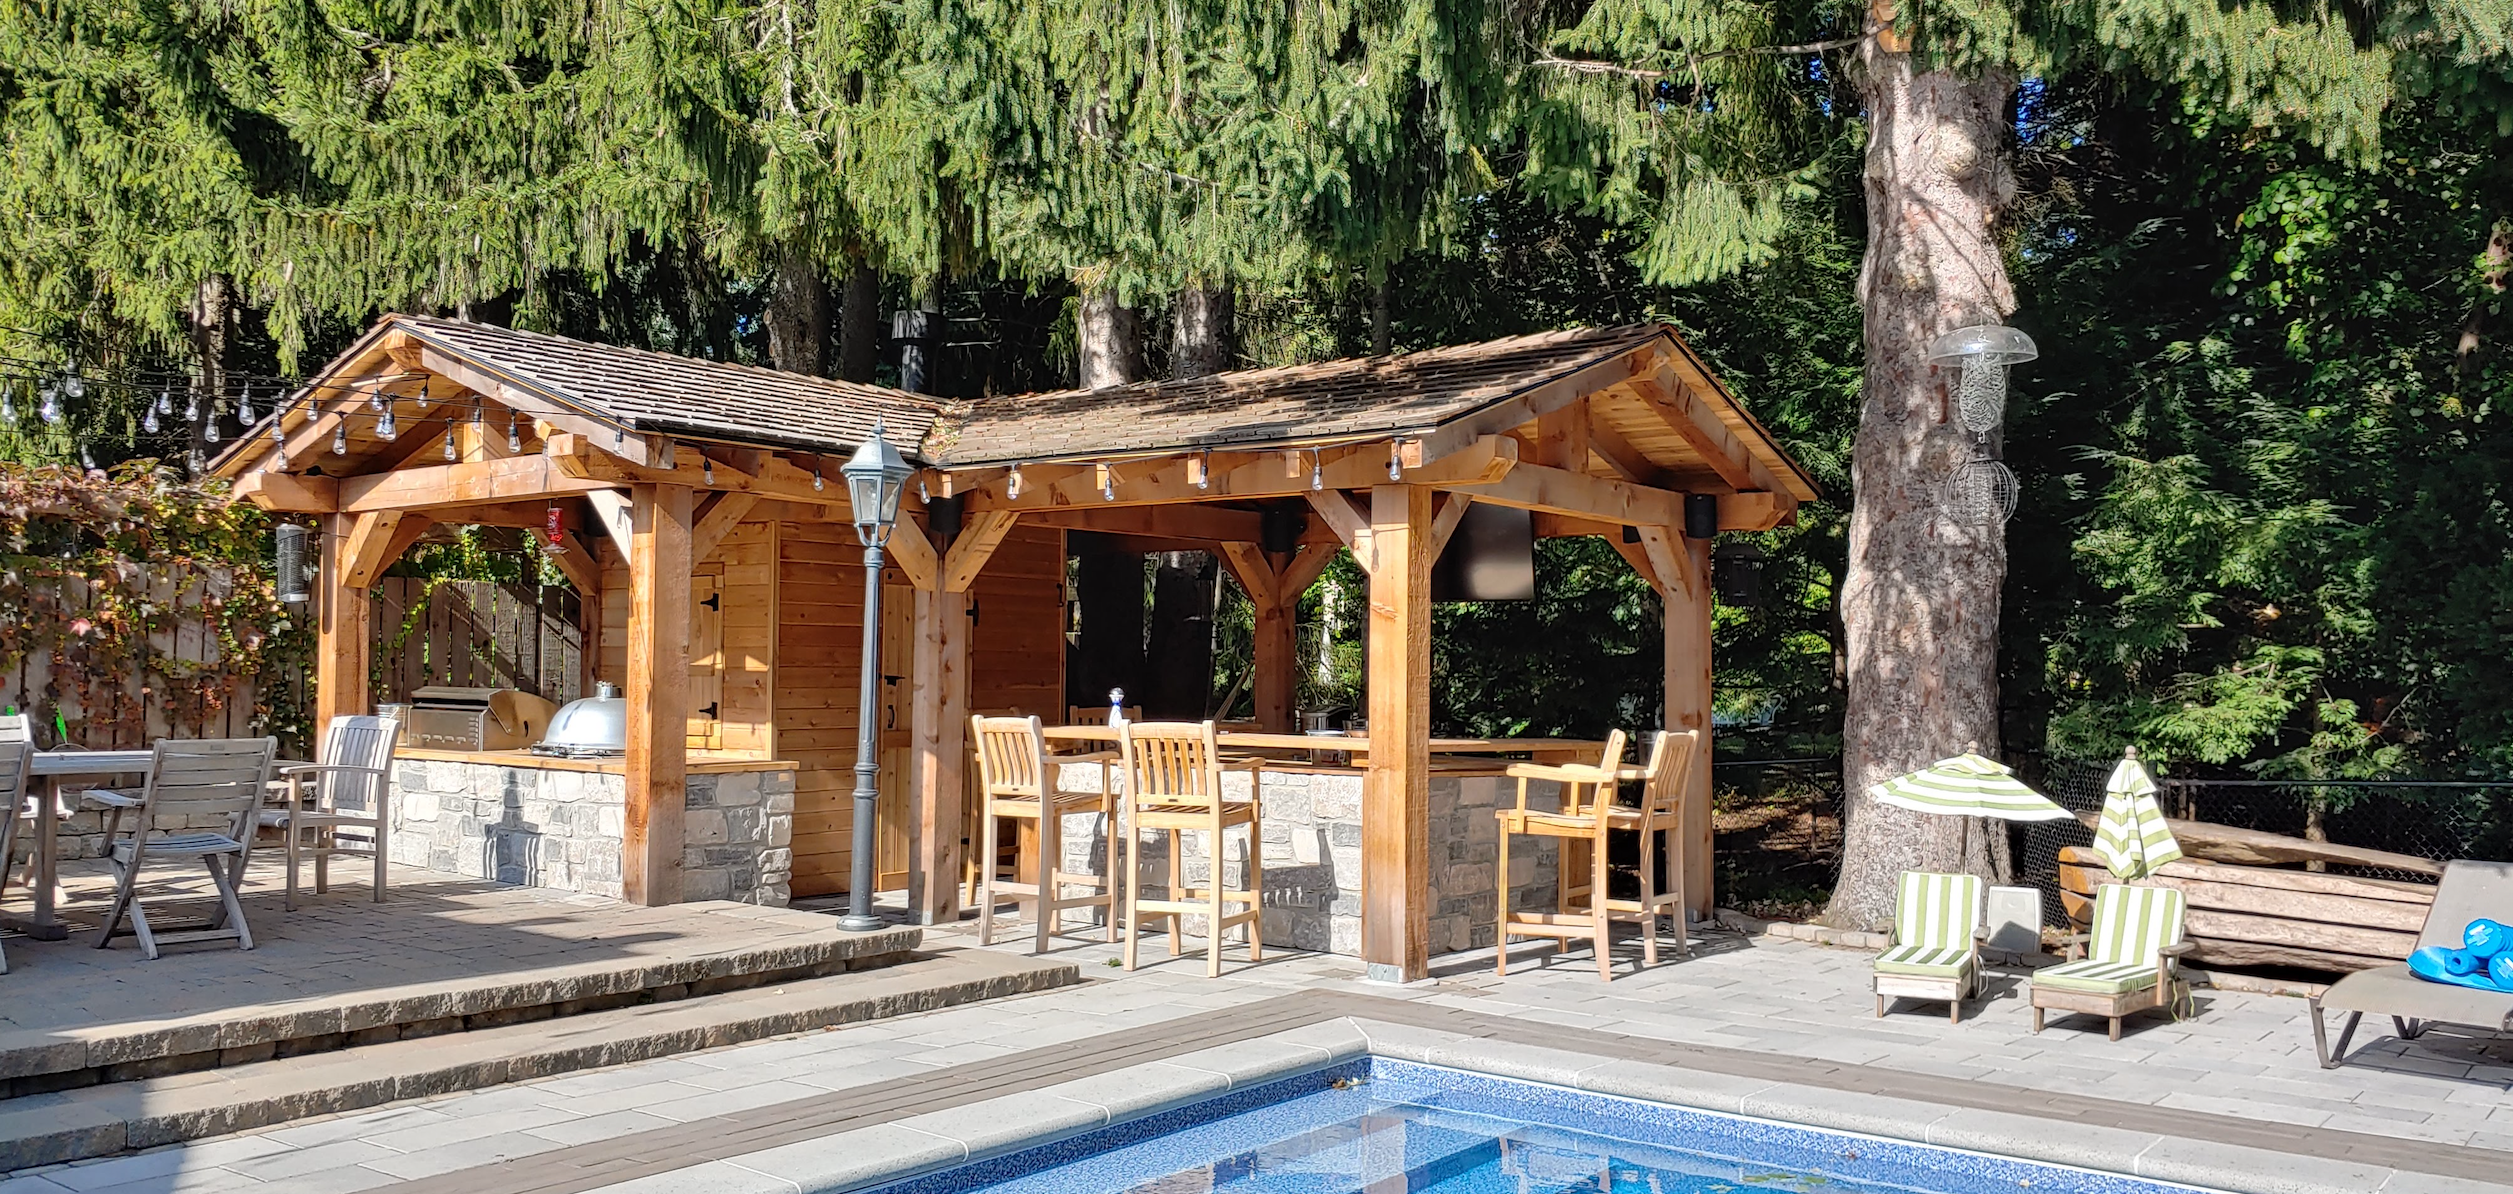
During the woodshed demolition, I spent considerable time back in that corner. Thinking endlessly about design … what would work. How to maintain visibility of the double tree trunk, utilize every inch I could (within bi-laws), and still have a shed to house the heater and filter, plus some storage. I came up with an “L-shaped” Cabana design, with an 8’ by 6’ enclosed shed structure within (the corner of “L” shape), but otherwise an open concept. With the available space, it was tight but there might just be enough room for a functioning bar and TV on one side, and a kitchen counter with BBQ(s) on the other. If I heated the Cabana properly, this would become a 6 month add-on for living space, a place to relax early spring, have fun during summer months, and watch NFL Football come the Fall. A few sketches later, this is what I came with:


THE PERMIT – WINTER 17/18
With the sketches above, I started the permitting process with the City of Mississauga. It didn’t take long for a City Clerk to put their foot down and say – Dave, you’re going to need better drawings! So I posted a Kijiji ad, and found Daniel Cheatley (http://wren-design.ca; dcheatley@wren-design.ca), a young and talented architect looking for freelance work. His rate was very reasonable and he was extremely helpful. Lots of back and forth, and in the end here’s a few of the images submited for permiting:


After a tedious 5 or 6 months, a City Council hearing for minor variances, and lots of time on the phone with City clerks, eventually the permit was stamped ‘Approved’ :)
CABANA BUILD – SPRING 2018
At last … phase II and the home stretch. As I write this, if I Google Earth my home the pic that comes up shows timber/lumber on the driveway (see above, 1st pic in this post). At that time, every day when I came home from the office/day-job, I had this beautiful BC Red Cedar Timber right there in the driveway – a constant reminder that once I got home from the office, it was time to go to work! The wood was beautiful, big chunky rough-cut red cedar - 8x8, 6x6, and 6x6 split down the middle for 6x3, plus 2x6 finished lumber in various size/lengths. I purchased the Lumber from Century Mill Lumber in Stouffville; total cost around C$15k; not cheap, but well worth it – the scent and the rustic look is priceless. Century Mill is an awesome place by the way, for new or reclaimed, precious/rare/speciality lumbers of all sorts … we’re talking wood varieties you didn’t know existed – they have it!
March-April-May … every Saturday and Sunday, weekday evenings after work until dark, every chance I could … I was back there … one step at a time, working through it. I hosted one final “Concrete Arrival Day II” for the shed slab, pouring for the eight 16” 5-foot deep footings, and the 4 inch cement topping on the stairs. For the 8x8 cedar posts, sourcing the steel rebar carport saddles was a bit tedious, but eventually I found Simpson Strong-Tie to get what I needed. Timber construction was like a jig-saw puzzle that I made up as I went along, using the permit drawings as a guide. For cutting the timber, I bought a 10 1/4 Inch Worm Drive Beam Saw from Big Foot Tools; awesome tool, excellent company and sevice! As a motivator, I had a deadline in that my annual pool party was coming up on July 7th ... and I needed the basic structure (and ideally a bar) to be built for that event.


PARTY TIME – JUL 2018
Our 7th annual pool party was on July 7, 2018, 150ish people - friends, neighbors, clients, builders and business associates, etc. While the roof of the Cabana was nowhere near complete, I spent the final week leading up to the event, building the bar structure and ensuring that the TV set-up was good-to-go … for there was the 2018 FIFA World Cup Quarter Final Football Matches taking place during the party (Russia 3 vs. Croatia 4 & Sweden 0 vs. England 2). At all costs – those Soccer matches had to be on! I assumed the crowd would want the music volume lowered and game sound turned up, at least during the final minutes of each match. Our 7th Annual was a success, and although the cabana construction wasn’t complete, the set-up was so much better than previous years, and the project/marketing exposure was productive.


CABANA ROOF - ALL RED CEDAR - VAULTED CATHEDRAL CEILING - FALL 2018


FINISHING THE BAR & KITCHEN – JUN/JUL 2019
Nearing the end of the project and the 3rd spring season largely occupied by this endeavour, I had to search for materials for the bar and kitchen counter finishing. How to face the bar was particularly important, and I spent a lot of time considering options. Scouring through Pinterest and Houzz and Instagram, I came across natural stone. I fell in love with the rich, classy, prestigious, earthy, and natural look … perfect for this setting. This was the catalyst that lead to the launch of my stone site, Natural Brick and Stone Depot. Further, Patio Heaters was on my mind, for I knew that proper warmth was key to extending the use of the patio and cabana, early Spring and late Summer + Fall.


For finishing touches a final wave of products/supplies were purchased (mostly online) and delivered to my doorstep:
- Grill Dome Infinity Series XL Kamado Grill (made in India); total game changer for cooking & entertainment
- DCS 36” Traditional Grill with Rotisserie, Natural Gas, BH1-36R-N (made in USA)
- Limestone Blend #19 Ledgerock Thin Veneer for the Cabana Bar facing and outdoor kitchen counter
- 2x Ceiling Fans – 52” Minka Aire Shangri-La Ceiling Fan, Vintage Rust with Bamboo Rattan, F580-VR/BB. Purchased from Modern Fan Outlet (amazing customer service; massive selection)
- Hammock – Large Original DuraCord Rope Hammock – Oatmeal, purchased online via Pawleys Island Hammocks, USA.
- Barstools – 6x 30” Teak Patio Bar Stools, by HiTeak Furniture, Yorba Linda, California; purchased online via Wayfair
Finally, with the exception of 'heat', the key essentials were in … I was done purchasing and could see the finish line. All-in cost for the Cabana was around C$35k (Lumber, BBQ’s, and Stone being the largest inputs; in that order). Not bad considering what I know the pros would charge, as builders that have seen the project first hand say 2x to 3x is probable if contracting out the job.
PARTY TIME – AUG 2019
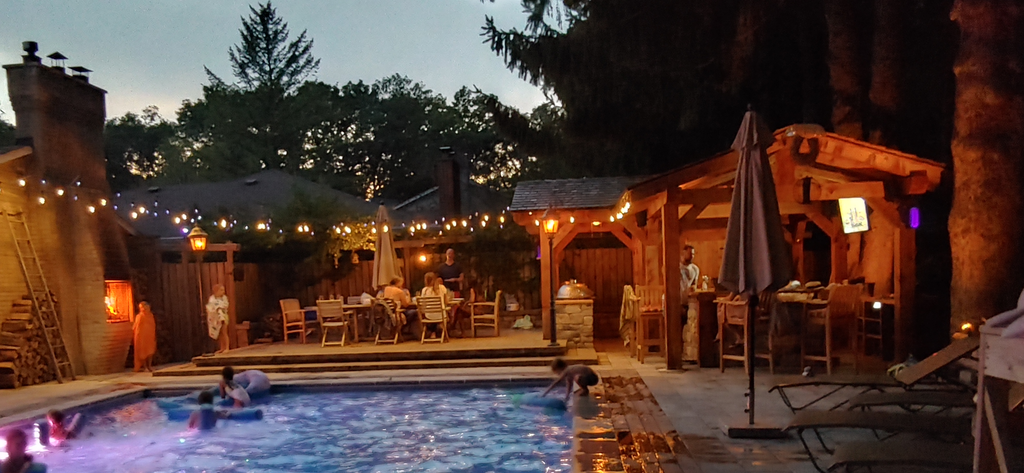
Aug 10th 2019 was our 8th annual pool party, and I’d say it was our finest to date. We had 3 bartenders and a bus boy running full tilt … operationally, the Cabana design worked incredibly well. We didn’t use the BBQ’s for this event but in futures years we'll fire-up up the grills and bring in a Chef to oversee.


WINDING DOWN – LATE SUMMER 2019

At this point, I still needed to finish the kitchen counter facing and cabinet doors, plus some shelving and cabinet doors inside the bar area. Also considering custom counter tops made for the bar and kitchen to replace the current cedar, but for all intensive purposes, this is just about done. AND still to do, Patio Heat!!
#NewCabana Cabana at completion:


Spring/Summer 2020
COVID-19 and all the stress and uncertainties ... we'll all remember 2020 without question.
... the Cabana has been well used to say the least. An outdoor office, leisure, TV, etc... we've spent a lot of time outside and enjoying the backyard. April/May evenings were cold though, so we were reminded that it would help extend the patio season if we brought in suitable heat. April/May +Sept/Oct, and maybe even Nov, proper patio heaters was the goal. So online hunting I went, researching reviews and product info re. gas and electric heaters ... looking for the right solution.
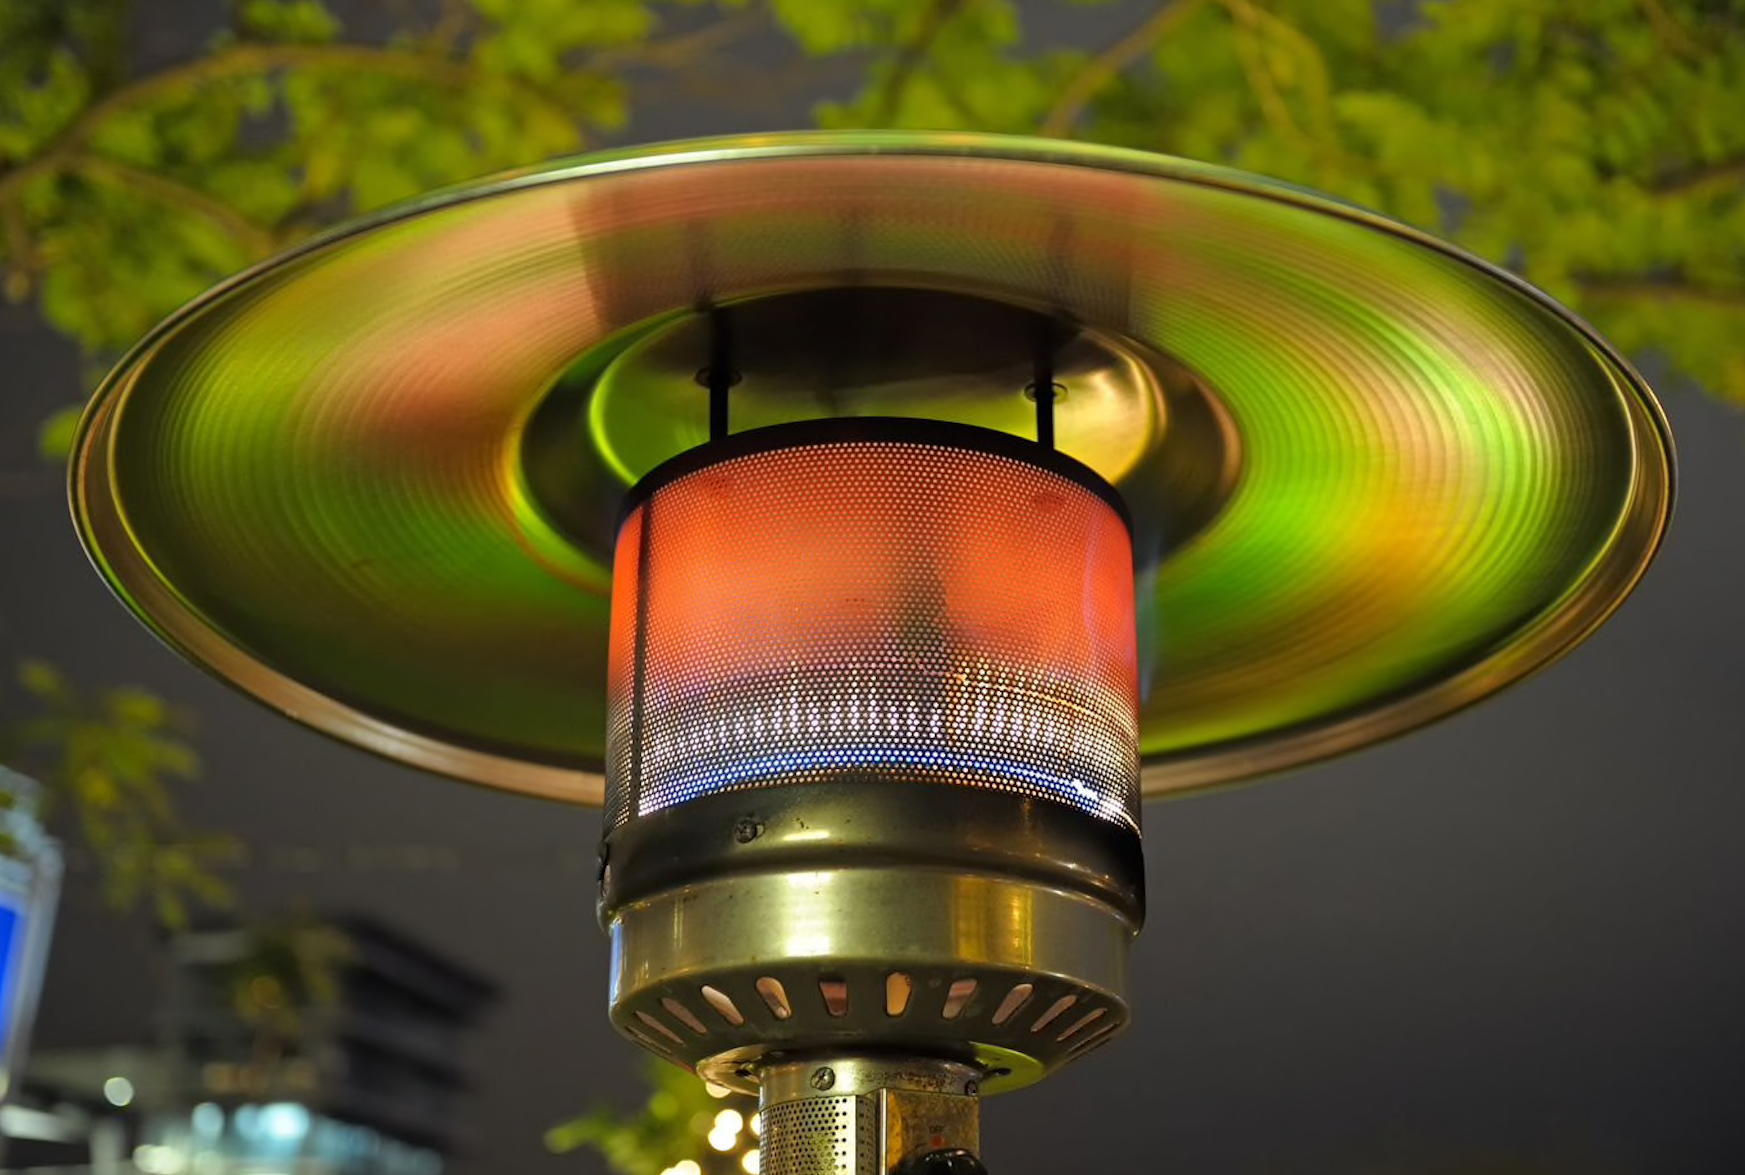
I ordered a small electric heater from Canada Lighting Experts, the Infratech - W15 - Single Element - 1500 Watt Electric Patio Heater. Customer service from Canada Lighting Experts was excellent, and the product arrived quickly. Problem is, I found that while the heat itself was a nice gentle warming sensation on the skin, and the distance/range was very much in-line with the product description, it wasn't enough heat for the area. Or rather, to achieve what I needed, I would way more juice, and electrical power for that much heat would be a challenge. High-end 'gas' seemed to be the right call, and from the BBQ/Pool Heater Gas line, it would easy to tap into (for a gas installer).
Long behold, after some time researching, we found IR Energy, and the rest is history ... born be PatioHeatDirect.com.
Quality, durability, beautifully crafted with precision, efficient, and powerful ... IR Energy - evenGLO, evenTUBE, The Habanero, and eWAVE Heaters. From my findings, this is industry leading heating equipment, and the best of the best. Pricing is very reasonable for this [high-end] category, and IR Energy (and Parent Co - SRP founded over 25 years ago), Family run, are a company that stands behind their product via Warranty, strong reputation, and ongoing success.


We're thrilled that this DIY backyard renovation project turned out to be so much fun, brought family and friends together, and became a catalyst to grow our ecommerce business.
Thank you for reading!
To heat your oasis, let's talk!
Sincerely,
Dave Hammond
(289) 809-6762
dave@ship2user.com
www.PatioHeatDirect.com

https://www.facebook.com/dbhammond
https://ca.linkedin.com/in/davehammond
Published: August 20, 2020
Leave a comment
This site is protected by hCaptcha and the hCaptcha Privacy Policy and Terms of Service apply.